September 12, 2024 — MRI Center Director Position Available
Applicants should apply via Interfolio: https://apply.interfolio.com/150512
Submit a letter of interest, teaching statement (including evidence of teaching effectiveness), diversity and inclusion statement (which includes a description of how three or more BIE criteria are satisfied), a current curriculum vitae, 3-5 representative reprints, and contact information for 3 references. Review of applications begins on November 1, 2024, and we will consider applications until the position is filled. For questions, please contact the Committee Chair, Tristen Inagaki, tinagaki@sdsu.edu
Jan 24, 2023 — RF Transmitter Replaced
RF Transmitter Replaced
The Siemens engineers have replaced and tested the RF Transmitter following reports of errors pertaining to the 2Ch-BiasMaster and 2Ch-BiasSlave1.
Jan 01, 2023 — Marty Sereno Retires as SDSU MRI Imaging Center Director
Marty Sereno Retires as SDSU MRI Imaging Center Director
Marty Sereno (current webpages here and here) retired as director of the SDSU MRI Center in Dec 2022. He arrived at SDSU in 2016 to help design and set up the new center. now used by a group of researchers in Psychology, Speech Language and Hearing Sciences, Engineering, and Exercise and Nutritional Sciences, and has generated interest from several local MRI-related start-up companies.
His two online video classes (advanced undergraduate/beginning
graduate level) on the Foundations of Neuroimaging and Systems
Neuroscience are publicly available here:
Foundations of Neuroimaging (58 one-hour lectures)
Systems Neuroscience (52 one-hour lectures)
and also at his youtube channel.
These class lectures are recorded with the innovative SDSU Learning
Glass (transparent blackboard developed by SDSU physics professor Matt
Anderson). Finally, some of his recent research seminar presentations
recordings can be found here:
The Shape of Thought 2024
The Shape of Thought
DNA and Language
On Brainmaps
Finally, he will continue to maintain two free software packages, 'csurf' and 'mapper'. The 'csurf' package for cortical surface-based analysis that can be downloaded for MacOS and Linux operating systems from here:
https://mri.sdsu.edu/sereno/csurf
https://pages.ucsd.edu/~msereno/csurf
This software has user-friendly tools useful for fourier analysis of 'phase-encoded' retinotopic, tonotopic, and somatotopic stimuli. An example stimulus is a flashing wedge periodically rotating around a fixation point, or periodic sweeps in audio frequencies from low to high.
Another software package, 'mapper', for generating periodic visual,
auditory, and somatosensory stimuli can be downloaded for MacOS and
Linux operating systems from here:
https://mri.sdsu.edu/sereno/mapper
https://pages.ucsd.edu/~msereno/mapper
These analysis tools can also be used to analyze the spatiotemporal time course of activation in response to any arbitrarily complex, but periodic, task (e.g., reach to eat).
The current csurf distribution includes a new FreeSurfer 'fsaverage' surface
parcellation of cortical areas containing topological maps including
visual, auditory, and somatomotor maps that covers almost 50% of the
neocortex. For more details, see:
Sereno, M.I., M.R. Sood, and R.-S. Huang (2022)
Topological maps and brain computations from low to high.
Frontiers in System Neuroscience 16:787737
(PDF here)
Resources, movies, and atlases
This parcellation provides 117 ROI's for topological maps in each
hemisphere that can be used to analyze any average data that has been
mapped to the FreeSurfer 'fsaverage' surfaces. These ROI's can also be
easily projected back into subject native-space to generate native-space
3D ROI's (see csurf).
This software also contains tools for high-resolution surface reconstruction, that can be used to analyze in vivo scans with higher resolution than the standard 1x1x1 mm scans typically used to make FreeSurfer surfaces. These surfaces will contain a much larger number of vertices (a finer surface mesh) than standard FreesSurfer surfaces.
It is also useful for reconstructing surfaces from very high-resolution post-mortem scans (e.g., cerebellum):
https://mri.sdsu.edu/sereno/cereb
This software is periodically updated (always download latest-dated version). Report bugs in csurf or mapper to msereno at ucsd edu.
Nov 30, 2022 — Danny Wang pCASL sequence available
Danny Wang pCASL Sequence Available
We have installed the Danny Wang pCASL sequence (pseudo/pulsed continuous arterial spin labeling). Five example protocols are available in the Sereno protocol tree under "Wang-pCASL". This is a 3D GRASE sequence (gradient and spin echo) that generates a labeled and an unlabeled scan. The most basic analysis is to subtract labeled (labeled inflow is attenutated) from unlabeled to reveal a positive perfusion signal. Eight repeated measurements take about 5 minutes.
Apr 13, 2022 — 'Spikes' Have Not Come Back
'Spikes' Have Not Come Back
For the past 2 weeks, we have been unable to reproduce the 'spikes' we noticed in a small number of EPI volumes several weeks ago. The Kineticor system has continued to blink, but this has not yet been associated with any of image anomalies (despite many hours of continuous EPI scanning).
We will be having an additional Siemens service visit on the comming Tues morning. One possibility (of many!) is that these spikes might have been associated with a humidity change and some transient condensation when the weather suddenly spiked to over 90 deg F several weeks ago.
One theory is that the occasional spikes are due to occasional TIG welding (gas tungsten arc welding) going on in the engineering lab directly over the scanner.
Dec 02, 2021 — Cold Head Replaced
Cold Head Replaced
The cold head (the business end of the 4 degrees above absolute zero refrigerator that reliquifies the helium) has been replaced. These normally last for about 4 years, which is almost exactly how long ours lasted.
This delicate operation involved a ramp-down/ramp-up of the magnet, which is now reshimmed and ready to use. For a look at the old cold head, immediately after removing it, see the movie below. The surprisingly small fluted structure at the bottom is what re-condenses helium to a liquid so that none is lost, and is what keeps the entirety of the large superconducting coils that generate the B0 field superconducting.
Sep 28, 2021 — RF Input Chain Problems Fixed (Again)
RF Input Chain Problems Fixed (Again)
Another circuit board replacement (RCCS again) has fixed the re-occurence of RF input chain problems. The magnet is back up and ready to use.
Aug 17, 2021 — Cold Head Replacement Planned
Cold Head Replacement Planned Later This Year
The 'cold head', the business end of the magnet refrigeration system (it's the thing that makes the periodic 'tweet' sound) is getting a little long in the tooth. Siemens will be replacing it later this year. This is a 2-day operation.
It remains OK to scan! All internal temperatures and pressures are normal and newly acquired the data passes our QA. We will give you plenty of notice before we schedule this maintenance.
Jul 01, 2021 — Scanner RF Input Chain Repaired
Scanner RF Input Chain Repaired
On Monday, Jun 28, we detected brightness flickering in an EPI time series from a live subject that had the signature of an intermittent problem with several input channels for the 32-channel head coils. We were then able to reproduce the problem with a phantom using several different head coils.
Over the past several months, we had noticed this problem in two other isolated instances from EPI time series scans. But extensive testing with a phantom after each instance failed to reproduce the problem. At the time, we thought the problem might have been due to an improperly seated head coil plug. We have retrospectively examined EPI scans collected by several different groups over the past several months and found no other instances of the problem. Luckily, this time, the problem persisted long enough to allow it to be diagnosed.
On Tuesday, the Siemens engineer confirmed that the problem was somewhere in the RF input chain and ordered new parts. On Thursday, the RCCS board was replaced (this circuit board has, among other things, a multiplexer that routes signals from all various scanner table plugs into the 64 receiver channels). This immediately fixed the flickering problem.
The scanner is back up and ready to use.
Jan 25, 2021 — Saving Timestamped Physiological Data
Saving Timestamped Physiological Data
The Minnesota CMRR multiband EPI pulse sequence can log Siemens pulse oximeter, respiration, and volume acquisition times to text files. For details, see the Tips/FAQS page.
Dec 16, 2020 — Scanner Center On Backup Generator
Scanner Center On Backup Generator
The scanner center will be attached to the backup generator over this weekend. We are very happy this has finally come to pass. It will allow us to preserve our hard-to-replace liquid helium supply, in case there is an unexpected power outage lasting more than a few hours.
N.B.: The scanner center remains open for research groups to scan For detailed information on scanning in the time of covid, go to the Forms page to find the new "COVID-19 Safety Manual" and the "COVID-19 Screening Checklist".
Personal protection equipment and a sign-in sheet are found immediately to the left of the control room door. If there are any questions, or problems accessing the building, don't hesitate to email msereno or smolnar at sdsu.
Jul 20, 2020 — Scanner Center Now Open
Scanner Center Now Open
The scanner center is now open for research groups who have an approved "Lab Re-Population Plan". For detailed information on scanning in the time of covid, go to the Forms page to find the new "COVID-19 Safety Manual" and the "COVID-19 Screening Checklist".
Personal protection equipment and a sign-in sheet are found immediately to the left of the control room door. If there are any questions, or problems accessing the building, don't hesitate to email msereno or smolnar at sdsu.
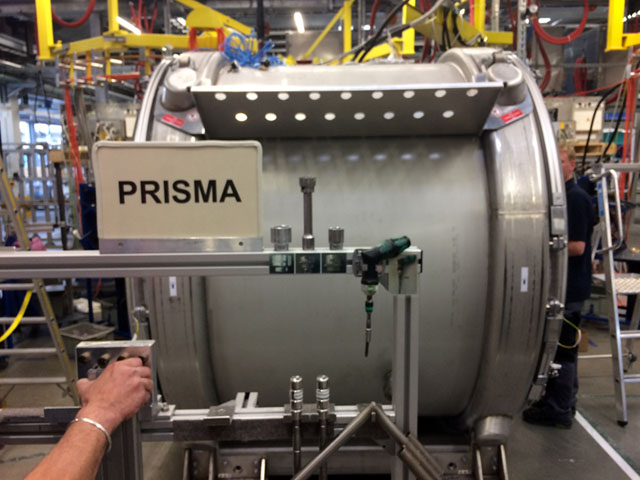
May 19, 2020 — Preparation for Scanner Center Re-Opening
Preparation for Scanner Center Re-Opening
Our Prisma has remained up-to-field and is checked daily. A first draft of our new cleaning and screening procedures can be found here. The size of the scanner suite, room EISC 16, is 2075 sq feet.
November 19, 2019 — Kineticor System Re-Installed
Kineticor System Re-Installed
The Kineticor system has been reinstalled and recalibrated (one of the cameras had malfunctioned, causing its image to jiggle).
November 04, 2019 — Front-Surface Mirrors
Front-Surface Mirrors Available on Request
The Siemens mirrors are back-surface mirrors (that is, standard mirrors). As with all back-surface mirrors, they produce minor secondary reflections. These arise from the non-silvered front surface and from the back surface image reflecting off the inside of the front surface and then again off the silvered back surface.
With most stimuli, these minor reflections will be totally invisible. However, with a very narrow, high-contrast, horizontal line, the secondary images may be visible as very faint copies of the horizontal line displaced slightly above and below the main image.
Front surface mirrors are more delicate than back-surface mirrors because the silvered reflecting surface is directly exposed to dust and finger prints, and because it is more easily scratched and more difficult to clean than the non-silvered front surface of a standard mirror (which is why standard mirrors are back-silvered).
We have purchased front-surface acrylic mirrors that can be attached to the rear-projection screen mirror and for the Kineticor compatible mirror that are available for researchers for whom these minor secondary reflections may be problematic.
We are testing them to see how robust they are to the slings and arrows on everyday scanning ☺.
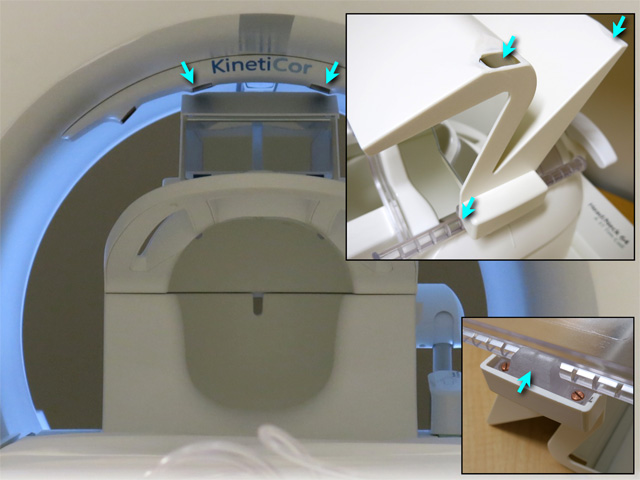
October 15, 2019 — Kineticor-Compatible Mirror
Kineticor-Compatible Mirror
The Kineticor-compatible mirror is stored in the Kineticor cabinet (top left), behind the nose markers. It allows all 4 cameras to see the nose markers. For rear projection, it should be installed and adjusted by the experimenter before inserting the subject (it easily clears the head coil/subject). It is velcro'ed to the top of the bore with the rounded cut-outs in the wooden supports touching the front of the Kineticor camera 'wing'.
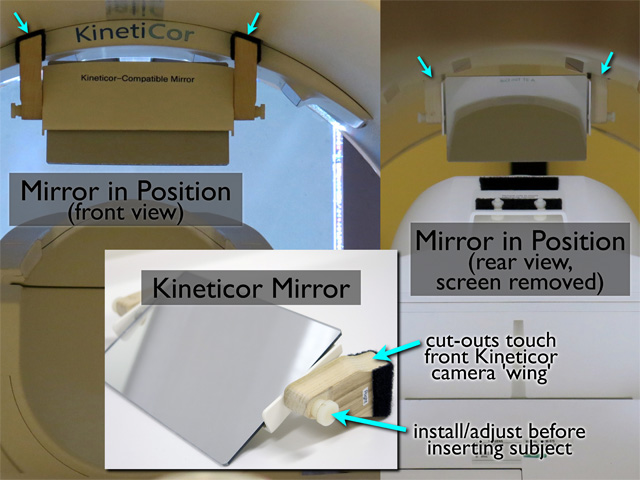 Kineticor compatible mirror
September 19, 2019 — MRI Simulator Booking Now Available
MRI Simulator Can be Booked on Calpendo
The MRI Simulator is now available for booking through Calpendo. The equipment is designed to help researchers determine if a potential participant will remain calm and motionless when in a confined space. PIs and Operators are encouraged to reserve the MRI Simulator during recuritment to screen participants before committing to booking them in the real scanner. When used properly, the MRI Simulator can help participants feel comfortable in the bore and reduce the possibility of them ending the session early or leaving the study altogether.
 Mock Scanner
April 26, 2019 — Art of Science, Sunday, April 28
The Art of Science — La Bodega Gallery, Sunday, April 28
On this Sunday, April 28, The Taste of Science festival has a San Diego event at La Bodega Gallery, 2196 Logan Avenue, on "The Art of Science" with presentations by Marty Sereno and Janet & Mark Hubka:
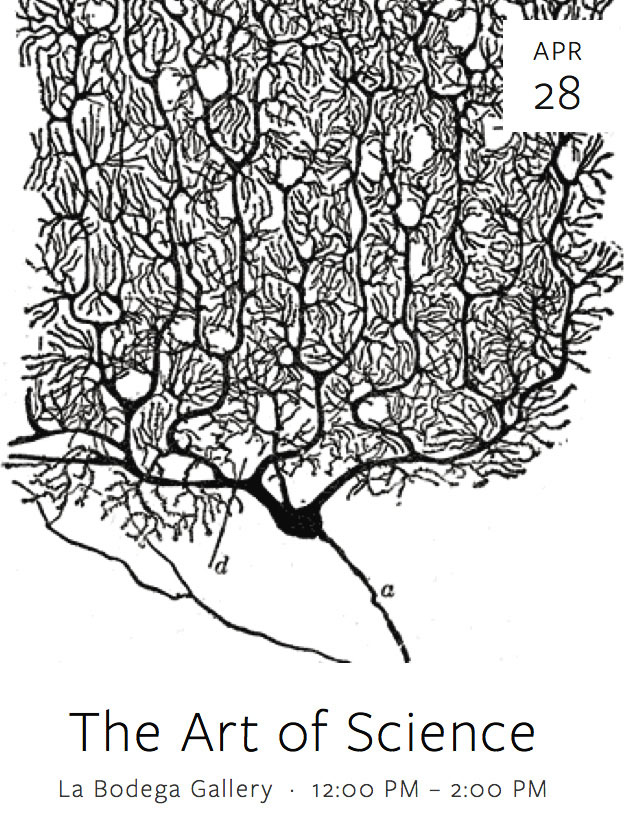
website: https://tasteofscience.org/san-diego-events/the-art-of-science
April 25, 2019 — 20-Channel Air Puffer Installed
20-Channel Somatosensory Air Puffer Installed
The 20-channel somatosensory stimulation system using air puffs has been installed!
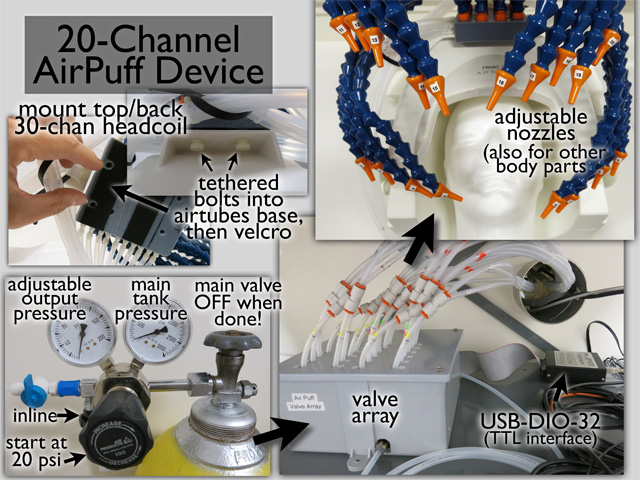 20-channel somatosensory air puffer
The valves in this system are driven by 20 TTL lines. Currently, these are connected to a USB-DIO-32 box that converts USB to 32 bits of TTL I/O. There are Windows and Mac drivers for this system (e.g., to use from MATLAB), or the user can directly attach TTL-level signals (e.g., from a National Instruments box).
The array of air tubes can be anchored to the back end of the 30-channel coil with two tethered nylon bolts, then velcroed. The base can also be attached to board with two other nylon bolts for stimulating other body parts. The air tubes are driven by a compressed air cylinder to the left of the room door.
Minimal HOWTO:
(1) Turn delivered pressure OFF: N.B.: unscrew (CCW) large black knob
(2) Turn main cylinder ON: unscrew (CCW) top valve
(3) Check main cylinder pressure (right gauge) (full cylinder: 2200 psi)
(4) Set 20 psi (left gauge) delivered w/large black knob (N.B.: screw in to increase)
(5) open final black in-line valve
(6) set up TTL valve control
When done, reverse procedure (be sure to finish with main valve OFF!)
March 23, 2019 — Science Sampler Day
Science Sampler Day at the MRI center
On Saturday, March 23, the MRI center hosted interested guests for Science Sampler Day, part of Explore SDSU Day.
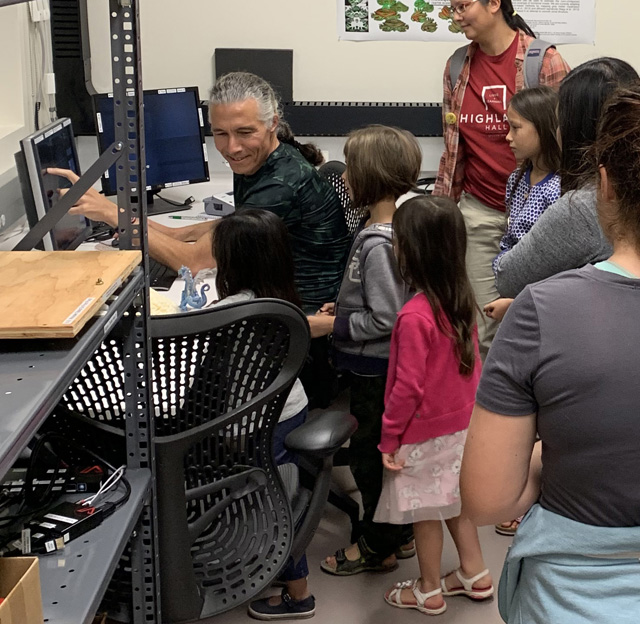 Brains show and tell
March 21, 2019 — MRI Simulator Installed
Our MRI Simulator has Arrived
Our mock scanner has arrived and is nearly ready to use. The MoTrak software will soon be installed on a PC, which will also drive a second LCD display inside the mock scanner that can display MoTrak subject feedback as well as researcher-specific practice stimulus paradigms.
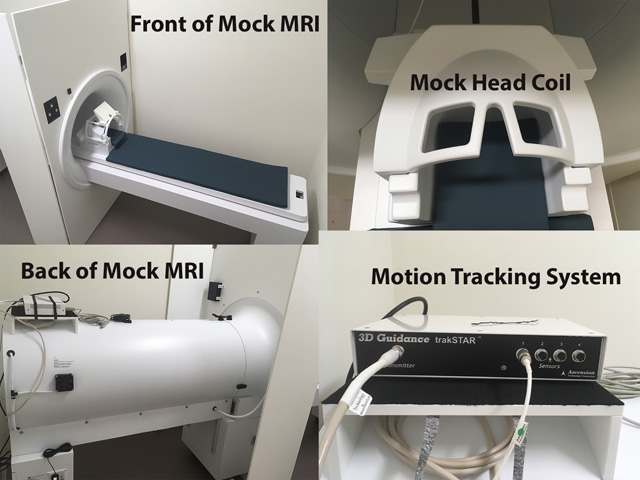 Psychology Software Tools - MRI Simulator
February 19, 2019 — Next Safety Training: Thurs, Feb 28, 10-11 AM
Next Safety Training: Thurs, February 28, 10-11 AM
An MRI Safety Training class will be held at the MRI scanner suite next week:
- when: Thurs, February 28, 10-11 AM
- where: SDSU Imaging Center, EISC, Room 16
The SDSU Imaging Center is on the lower level of the south hall of the new Engineering and Interdisciplinary Science Complex (here is an interactive map showing its location).
Anyone who plans to use the MRI center (that is, enter the MRI control room and/or the MRI magnet room) will need to take this short course. Even people with previous MRI experience must take the course to learn about site-specific emergency procedures, and to get on our books.
Before arriving, memorize the contents of our short document on MRI safety (PDF).
Also take a look at our Participant Screening Form (PDF).
Finally, be sure to sign in when you get here.
No worries if any interested party can't make this session of the class. It will be offered on a regular basis every month as needed during the startup period.
February 12, 2019 — OptoAcoustics Headphones/Microphones Installed
OptoAcoustics Headphones/Microphone System Installed
The OptoAcoustics headphone/microphone system has been installed!
This system is parallel to the Siemens intercom, which still works. You can continue to use the Siemens system if you prefer. The OptoAcoustics system consists of a noise-cancelling microphone, a pair of slim, noise-cancelling earphone units that fit into both 32- and 64-channel coils, and slim inflatable outer pillows that slip in between the headphones and head coil to evenly hold the headphones in place.
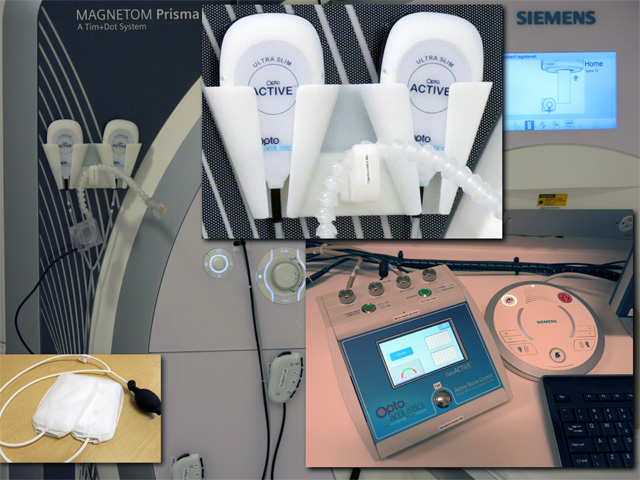 OptoAcoustics noise-cancelling headphones/microphone
The gooseneck microphone (double optical microphone) permits recording completely un-artifacted vocal responses during scans and provides extremely clear subject feedback. In contrast to the Siemens intercom, the EPI beeps are completely suppressed, allowing you to even hear the subject whispering during a scan. It's worth telling subjects not to yell. The headphones have piezoelectric drivers and each contains another optical microphone for noise cancellation, but also for recording exactly what the subject is hearing and for setting absolute stimulus sound pressure levels (visible on OptoAcoustics console). The OptoAcoustics feedback speaker can be switched between the subject microphone (what the subject is saying -- default: button out) and the headphone microphone (what the subject is hearing).
Remember that scanner noise gets into your ears via two paths. The first is through the outer ear into the ear canal. The second is via 'bone conduction' directly into the inner ear (vibration of the head in contact with the head coil, sound in the air entering the body and being transmitted to the inner ear). Noise cancelling earphones (and ear plugs) can only cancel noise coming into the ear canal, but not noise entering via 'bone-conduction'. The noise-cancellation performance of the OptoAcoustics system is comparable to very-well-seated ear plugs. But then they make it possible to deliver high quality auditory stimuli with very easy setup.
The OptoAcoustics system uses an initial 16 sec period (after the first scanner pulse) to 'learn' the spectrum of the repeated noise. During this time, no audio stimulus should be presented. In order to obtain enough samples, the TR (repeated scanner sound) must be less than 3.6 sec. During this initial period, there is no noise cancellation. However, the sealed headphones themselves provide good attentuation of the scanner noise.
The audio input to the system is via a 3.5mm stereo headphone jack (LINE1) on the back of the OptoAcoustics control unit (in laptop cable bundle on desktop). An optical audio input is also accepted (LINE2). The noise-cancelled output of the microphone can be recorded along with the scanner trigger pulse via a stereo USB audio connection to the OptoAcoustics control unit. The stereo audio signal heard by the subject (after noise cancellation) can be recorded via the green analog stereo 3.5mm jack on front of the PC-like box under the desk.
Finally, the microphone signal can be fed back into the headphones to enable more naturalistic speaking (Self-Hearing dial).
Minimal HOWTO:
(1) Turn on OptoAcoustic desktop unit (back panel)
(2) "Start" (touchscreen)
(3) Setup mic/headphones/inflate-pads, move patient table in
(4) "Calibrate" (touchscreen, soft 'whoosh' in each ear)
(5) "Learn" (touchscreen => waits for scanner pulses)
(6) Start scan (noise cancellation starts 16s after 1st scanner pulse)
(7) Start soundtrack (16s after first scanner pulse)
January 29, 2019 — More New Pulse Sequences
Yet More New Pulse Sequences
The CMRR Multiband Package described below has been installed:
https://www.cmrr.umn.edu/multiband/
Demo protocols can be found in:
Marty -> MartyExamples -> 32chan -> cmrr-multiband
These protocols include gradient echo, diffusion-weighted, and spin-echo variants.
January 22, 2019 — More New Pulse Sequences
More New Pulse Sequences
The CMRR Spectroscopy Package described below has been installed:
https://www.cmrr.umn.edu/spectro/
Demo protocols can be found in:
Marty -> MartyExamples -> 32chan -> cmrr-spectro
January 14, 2019 — New Pulse Sequences
New Pulse Sequences
Usha Sinha and I have just installed several new WIP (works in progress) pulse sequences on the scanner.
The first is the classic "Look-Locker" quantitative T1 sequence. This is a 2D sequence suitable for verification of other time-optimized quantitative T1 acquisitions.
The second sequence is a single-shot (EPI) stimulated echo diffusion sequence. The large size of a stimulated echo makes it practical to use a much longer effective TE (e.g., 200 msec). This is suitable, for example, for better quantification of restricted diffusion. For basic physics background on stimulated echo, this lecture reviews spin echo, gradient echo, and stimulated echo (stimulated echo starts at 28 min).
December 17, 2018 — 20-Channel 'Air-Puffer'
20-Channel Somatosensory Air Puffer Online Soon
A 20-channel MR-compatible somotosensory stimulus device is nearing completion. This TTL-driven device uses solenoid valves to switch a stream of air from a compressed cylinder between the 20 output channels that pass as a bundle of air tubes through the lower wave guide.
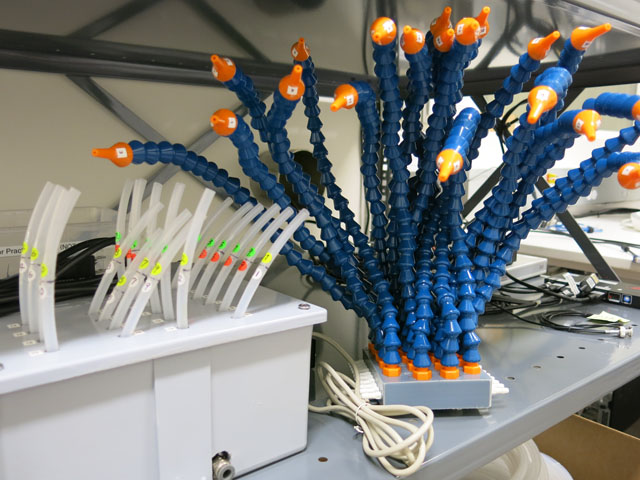 Air puffer in progress
One subject-end version of the device (above) has a set of flexible gooseneck air tubes mounted on the head coil that can be positioned over different skin regions on the head. Hand-, foot-, and mouth specific air nozzle sets are under construction.
The air pressure can also be used to drive a plunger.
December 05, 2018 — Magnet up Wed, Dec 05
Magnet up Wed, Dec 05
The Prisma is up and the cooling water circuit is back to normal.
November 30, 2018 — Magnet down Tues, Dec 04
Magnet down Tues, Dec 04 (only!)
The Prisma will be shutdown on Tues, Dec 04, in order to reconfigure an emergency backup cooling water circuit. Normal operation returns on Wed, Dec 05.
October 12, 2018 — MRI Talk at 2 PM
MRI Talk, Fri Oct 12 — 2-3 PM, Physics Building, Room 148
Multipronged MR Imaging of Parkinson's Disease: Potential for Early
Biomarkers
Xiaoping P. Hu, PhD
Professor and Chair, Department of Bioengineering
Director, Center for Advanced Neuroimaging
University of California, Riverside
October 10, 2018 — Safety Training: Wed, Oct 17, noon
Safety Training: Wed, October 17, noon
An MRI Safety Training class will be held at the MRI scanner suite next week:
- when: Wed, October 17, noon-1PM
- where: SDSU Imaging Center, EISC, Room 16
The SDSU Imaging Center is on the lower level of the south hall of the new Engineering and Interdisciplinary Science Complex (here is an interactive map showing its location).
Anyone who plans to use the MRI center (that is, enter the MRI control room and/or the MRI magnet room) will need to take this short course. Even people with previous MRI experience must take the course to learn about site-specific emergency procedures, and to get on our books.
Before arriving, memorize the contents of our short document on MRI safety (PDF).
Also take a look at our Participant Screening Form (PDF).
Finally, be sure to sign in when you get here.
No worries if any interested party can't make this session of the class. It will be offered on a regular basis every month as needed during the startup period.
October 9, 2018 — Out-of-Magnet Button Box
Outside-of-the-scanner Button Box
We now have an outside-of-the scanner Current Designs button box with a USB interface like the optical-based system in the scanner.
 Outside-of-magnet button box
N.B.: This is NOT magnet safe, and is strictly for use outside of the magnet room.
The (single) button box is physically similar to the button boxes in the scanner (same weight, key feel). This can be used outside of the scanner for subject practice or for testing response monitoring programs.
There are two minor differences between this button box and the right
and left hand pair in the scanner to keep in mind:
(1) the outside-of-the-scanner button box has a working thumb key
(the thumb keys of the left and right hand boxes in the scanner are
fixed/disabled).
(2) the outside-of-the-scanner box generates USB keypresses 1-5 for the
thumb to little finger (in contrast to the scanner button boxes, which
generate USB keypresses 1-4 and 6-9 for the right and left hand boxes,
both index to little finger).
September 25, 2018 — Hospitalization
I was seriously injured by an SUV while cycling home on Sept 18 and am now in the hospital.
For urgent center business, email me or Usha Sinha.
September 18, 2018 — Direct-view Projection Ready
Direct-view Projection Ready
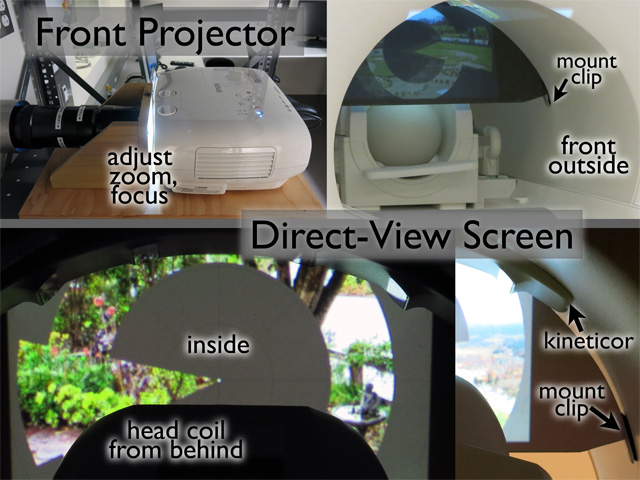 Direct view screen
The direct view screen (front projection) is now ready to use with the 30-channel coil. This setup has the largest visual angle by far, which is useful for retinotopic mapping, immersive stimuli, and studies in extrapersonal space.
Before putting the subject on the bed, put in the direct-view screen and adjust the zoom/focus/placement of the image. The screen is stored on foam pads in the left wooden cabinet (lower left doors). From the front of the bore, insert the screen with the dull gray side inward (toward the subject). First touch the top of the screen against the Kineticor camera wing, then tuck the left and right bottom edges of the screen into the small clips velcroed to the sides of the bore.
From maximum zoom, back off about 3/4 of a turn. Approximate focus is about 3/4 of a turn from completely screwed in. Finally, adjust the height by raising the leveler screw at the back until the nut is flush with the end of the bolt (this moves the image down on the screen).
Next, remove the bed cushions and the head coil, and put the thin lower back support cushion on the bed. Then insert the wooden prop and put the end of the 30-channel head coil on it and plug in top and bottom. Tilting the coil and removing the cushions makes it much easier to directly view the close-up screen. Be sure to provide additional padding for the neck and elbows.
Finally, don't forget to take the screen out before moving the bed out! (the screen will pop off the support clips with a just light touch, just in case).
September 07, 2018 — Rear Projection Ready
Rear Projector/Screen Installed
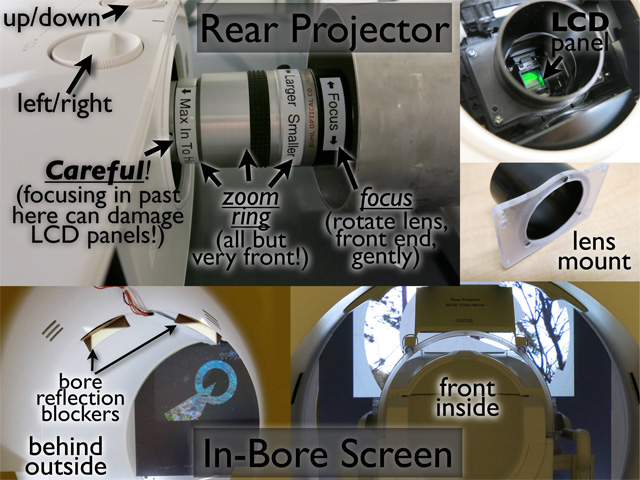 Rear projector and in-bore screen
The rear projector is now ready to use. The HDMI input cable is on the desk just to the left of the Siemens console computer. The HDMI splitter sends the same signal to the front and rear projectors, and the feedback display. Turn on the rear projector before inserting the desktop HDMI cable into your computer.
The screen is stored on foam pads in the left wooden cabinet (lower left doors). From the back of the bore, insert the screen with the dull gray side inward (toward the subject). Tilt the top of the screen inward and insert the top into the small clips just to the right of the Kineticor cable run. Then push the bottom of the screen forward until it hits the two small clips on the light-rails.
Use the rear-projector mirror. For the 30/32 channel coils, the front
facing double-mirror has been removed and the mount has been modified
to improve the view of the motion-correction markers:
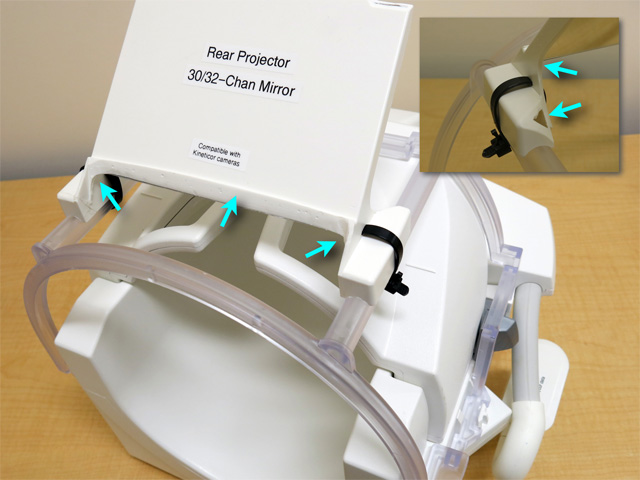 Rear projector mirror
The smaller zoom lens for the rear projector (in the equipment room) is mounted directly to the projector. The zoom and focus is already adjusted.
To re-adjust image zoom/size, rotate the middle part of the lens ("larger" and "smaller" directions labeled). Be sure not to screw the lens too far into the projector (there is a label "Max In to Here!"), else you risk the lens hitting and possibly damaging the LCD panels.
To focus, rotate entire lens by grabbing the very front of the lens (N.B.: the opposite from the larger front projector lens) labeled "focus". Rotate this with care so you don't snap the lens off of its mount.
To adjust left/right placement and up/down placement, use the knobs at the front of the projector (N.B.: in contrast to the front projector, where those knobs have no effect).
See the Tips/FAQs page for details.
Direct-view (super-wide-angle) screen coming soon.
August 10, 2018 — Safety Training: Wed, Aug 15, noon
Safety Training: Wed, August 15, noon
An MRI Safety Training class will be held at the MRI scanner suite next week:
- when: Wed, August 15, noon-1PM
- where: SDSU Imaging Center, EISC, Room 16
The SDSU Imaging Center is on the lower level of the south hall of the new Engineering and Interdisciplinary Science Complex (here is an interactive map showing its location).
Anyone who plans to use the MRI center (that is, enter the MRI control room and/or the MRI magnet room) will need to take this short course. Even people with previous MRI experience must take the course to learn about site-specific emergency procedures, and to get on our books.
Before arriving, memorize the contents of our short document on MRI safety (PDF).
Also take a look at our Participant Screening Form (PDF).
Finally, be sure to sign in when you get here.
No worries if any interested party can't make this session of the class. It will be offered on a regular basis every month as needed during the startup period.
August 2, 2018 — RF body coil replaced, magnet up
RF Body Coil Replaced, Magnet Up
A PIN diode in our RF body coil failed, and the entire RF body coil has now been replaced. The magnet is back up an ready to use. Kineticor will be re-installing the camera wing later this week.
July 05, 2018 — Mirror Mod(2) for Kineticor Install
64-channel Head Coil Mirror Modification for Kineticor Install
 Modified 64-channel head coil mirror for use with Kineticor motion
correction system
Modified 64-channel head coil mirror for use with Kineticor motion
correction system
The mirror for the 64-channel head coil has now also been modified to allow it to clear the cameras. As with the 32-channel coil mirror, it now rides directly on the mirror support rails, in this case secured by newly made plastic clips. Given the tighter clearance, larger divots had to be ground into the top of the mirror, and the lowered mirror itself was slightly shaved to allow it to pass over the midline nose coil housing.
To remove the mirror, pop off the rails-plus-mirror by exerting light pressure on the left or right rectangular mount point of the mirror. If you pull upward strongly on the mirror, it will pop off the rails. It can be popped back on by lightly pushing downward.
There is a second 64/20-channel head coil mirror in the cabinet that hasn't (yet) been modified (the mirror protector film is still on). It is clearly marked "Don't Use!!". It will run into the Kineticor cameras when the head coil gets near isocenter.
The rear projection screen is under construction.
July 03, 2018 — Mirror Mod for Kineticor Install
32-channel Head Coil Mirror Modification for Kineticor Install
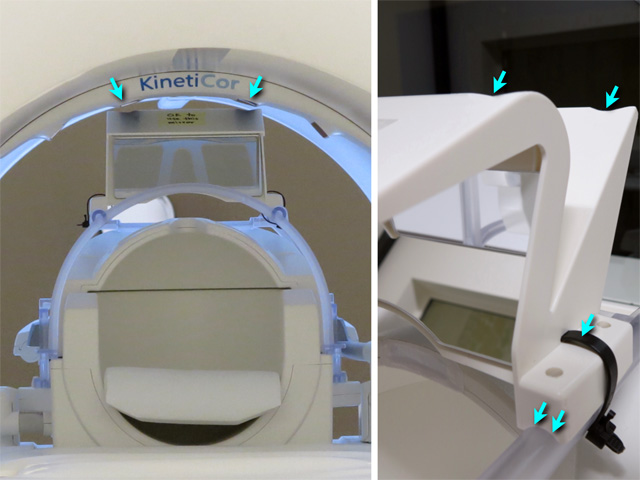 Modified 32-channel coil mirror for use with Kineticor motion correction system
The Kineticor motion tracking system has been installed and is being calibrated this week. The thin 4-camera 'wing' is attached to the top of the bore (visible in the pic above).
To allow the 32-channel head coil mirror to clear the cameras, it has been modified by lowering it slightly. It now rides directly on the mirror support rails secured by removable zip ties, and has divots ground into the top of the mirror for extra clearance.
There are two additional 32-channel head coil mirrors in the cabinet that haven't (yet) been modified. They are clearly marked "Don't Use!!". They will run into the Kineticor cameras when the head coil gets near isocenter.
A similar mod is in progress for the 64-channel head coil mirror, which has a smaller set of support rails. The 20-channel head coil (rarely used) takes that same mirror.
June 23, 2018 — Bob Turner talk on Tues, June 26
Bob Turner talk, Tuesday, June 26, 3 PM, 6363 Alvarado Court
Bob Turner, recently director of the Max Planck Institute for Human Cognitive and Brain Sciences and its 7T magnet in Leipzig, and pioneering physicist who co-invented functional MRI will give a talk entitled "7T MRI: A Game-changer for Imaging Neuroscience" at SDSU at 3 PM, in the Suite 250 Conference Room at 6363 Alvarado Court.
A talk flyer PDF is here.
The building location from Google Maps is here.
Here are two of his recent papers:
- Turner, R. (2016) Uses, misuses, new uses and fundamental limitations
of magnetic resonance imaging in cognitive science. Philosophical
Transactions of the Royal Society B 371: 20150349.
(PDF) - Turner, R. and D. De Haan (2017) Bridging the gap between
system and cell: The role of ultra-high field MRI in human
neuroscience. Progress in Brain Research 233:179-220.
(PDF)
June 22, 2018 — Front Projector Installed
Front Projector Installed
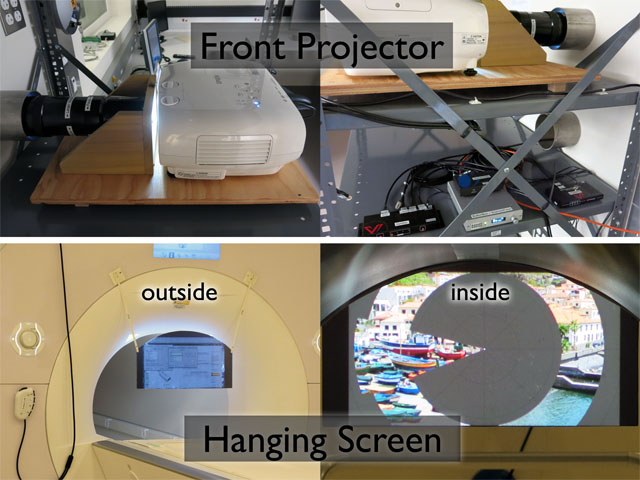 Front projector and hanging back-projection screen
The front projector is now in place. The HDMI input cable is on the desk just to the left of the Siemens console computer. There are DVI and mini-display port adapters as well as an analog VGA input.
The screen is stored behind the head coils and is hung from two plastic clips on the front of the bore (pop the zip tie in from the open inner side of each clip).
The heavy zoom lens is supported by triangular struts mounted on a piece of plywood, with the Epson 3100 projector immediately behind.
To adjust image zoom/size, rotate the front part of the lens ("larger" and "smaller" directions labeled).
To focus, rotate entire lens by grabbing the back part lens closest to the collar (labeled "focus"). This is more difficult to rotate than the zoom ring.
To adjust left/right placement, look through lower wave guide while making small left/right movements of end of plywood base closest to you. Moving that end to left moves image to the right.
See the Tips/FAQs page for details.
June 8, 2018 — Kineticor Prospective Motion Correction System
Kineticor Prospective Motion Correction System
The Kineticor video-based prospective motion correction system is being installed this month. It should be ready for initial trials by the end of June. Check back here for announcements on user training.
June 4, 2018 — Current Designs Bimanual Button Box Installed
Current Designs Bimanual Button Box Installed
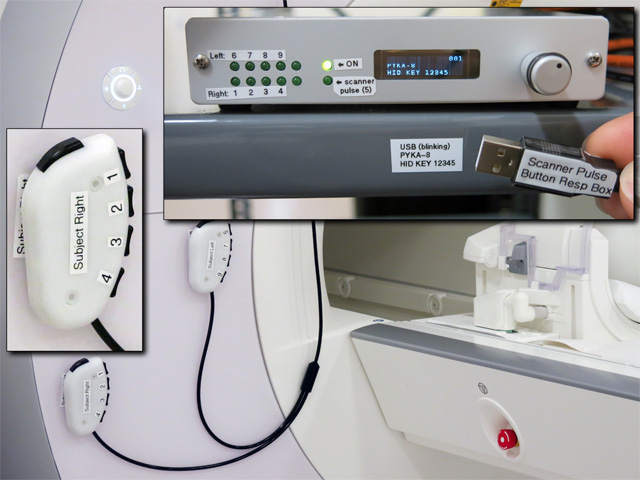 Current Designs 'Pyka' left and right hand buttons (thumb disabled)
The bimanual button box from Current Designs is now in place. The USB interface cable is on the desk just to the left of the Siemens console computer.
The USB interface control unit generates a '5' keypress at the start of each new volume (for starting your stimulus program). It generates USB keypresses '1' to '4' (subject right hand, index to little finger), and '6' to '9' (subject left hand, index to little finger). The numbers generated by each button (and left and right hand) are labeled on the identically shaped button boxes. Auto-release is turned ON, so holding down a key will *not* generate a train of characters.
Both the scanner pulse and the subject responses signals come through a single standard USB cable.
April 29, 2018 — Safety Training
Safety Training
Our second MRI Safety Training class will be held at the MRI scanner suite this week:
- when: Wed, May 2, noon-1PM
- where: SDSU Imaging Center, EISC, Room 16
The SDSU Imaging Center is on the lower level of the south hall of the new Engineering and Interdisciplinary Science Complex (here is an interactive map showing its location).
Anyone who plans to use the MRI center (that is, enter the MRI control room and/or the MRI magnet room) will need to take this short course. Even people with previous MRI experience must take the course to learn about site-specific emergency procedures, and to get on our books.
Before arriving, memorize the contents of our short document on MRI safety (PDF).
Also take a look at our Participant Screening Form (PDF).
Finally, be sure to sign in when you get here.
No worries if any interested party can't make this session of the class. It will be offered on a regular basis every month as needed during the startup period.
March 23, 2018 — Ready!
Ready to go!
We are shimmed, re-shimmed, back up to field, and ready to go!
The Siemens Application Training week will start this Monday, March 26th at noon. Any interested party is invited to show up on that first half day. This will help us schedule specific training sessions for the week. If you can't make the first day, you are welcome later in the week (3 additional full days on Tues to Thurs).
March 17, 2018 — Shimming at 3T
Shimming at 3T
We are back up to field without event, now re-calculating passive shims, and then tune-up.
The Siemens Application Training week is on track for the week of March 26th. Tom Minahan from Siemens will be here to provide Siemens applications training from noon on Monday noon until noon on Friday.
Anyone interested is encouraged to show up for the first training session on Monday afternoon, March 26th, so that we can tailor training for the rest of the week.
So I can get a rough head count, please email me (msereno @ sdsu.edu) if you are interested in participating in one or more days of this training.
When the field was down, I unobtrusively observed that many people walking down the hallway would nonchalantly stroll in, past the official danger signs, right into the magnet room. As the quaint hand-written sign reminds, never forget that 'the magnet is always on'. It's not 'plugged in' and stays fully on, even when all the power to it is cut.
February 19, 2018 — Up To Field Soon
Up to Field Soon
Siemens is on site, doing a thermal cycle, which translates to 'turning the magnet on for good'. We are on track to be up to field in March.
January 31, 2018 — Mumbai MRI accident
Mumbai MRI accident
Fatal accidents with MRI magnets are exceedingly rare. For example, last year there were 1.3 million auto accident fatalities in the world (over 3,000 deaths per day) compared to zero deaths from MRI accidents. The last fatal MRI accident in the US occurred in 2001 (oxygen cylinder accidentally brought into magnet room in a hospital).
This week, there was a fatal accident in a hospital MRI magnet in Mumbai. A family member was mistakenly allowed to bring an oxygen cylinder for his aging relative into the magnet room, the cylinder got sucked into the magnet trapping his hand, but also rupturing the oxygen cylinder. This rapidly released pure oxygen, which is corrosive and extremely cold as a result of the sudden decompression, and which caused fatal respiratory arrest.
It's worth taking a look at the misleading reporting on this tragedy. First, there were the usual click-bait headlines, "Man sucked into magnet" as opposed to a more accurate, "Man trapped between metal object and magnet" or "ruptured oxygen cylinder kills man". But many of the reports implied that the problem was that the family members weren't told that the "magnet was turned on". This is extremely misleading because the main magnetic field is always on, continuously, for years at a time. The main superconducting magnet is not 'plugged in'. In fact, it will stay fully 'on' even if all the electrical power goes off. Some of the articles got corrected, no doubt after MRI-knowledgeable people complained.
The bottom line is: MRI is extremely safe, as long as everybody scrupulously follows the simple but critical safety guideline: never, ever bring a ferrromagnetic object into the magnet room.
January 18, 2018 — Siemens Applications Training Rescheduled to Mar 26th
Siemens Applications Training Week Rescheduled to March 26th
A further series of construction delays have prevented Siemens from ramping the magnet back up to field in time for the Siemens Applications Training originally rescheduled for January 29.
The Siemens Application Training week therefore had to be rescheduled to the week of March 26th.
The recent hurricane season has put substantial stress on MRI manufacturers (e.g., Siemens alone has had to re-cool and re-fill cryogens for more than 70 quenched magnets in the southeast of the US).
Very sorry for the additional delay.
November 30, 2017 — Siemens Applications Training Rescheduled to Jan 29!
Siemens Applications Training Rescheduled to Jan 29!
[Update: Re-Rescheduled above!]
Last minute construction delays have prevented Siemens from ramping the magnet back up to field in time for the Siemens Applications Training that was originally scheduled for the week of December 4.
Therefore, we have had to cancel the December 4-7 training sessions.
Because of the holidays and the short notice, Siemens was not able to reschedule the applications training until the week of Jan 29, 2018.
Sorry for this late notice (and the delay).
November 20, 2017 — Siemens Applications Training
Siemens Applications Training
[Update: Rescheduled above!]
Siemens Applications Specialist Tom Minahan is currently scheduled to be here from 9 AM on Monday, December 4, until late afternoon on Thurs, December 7, to train interested parties on the use of Siemens applications on our new Prisma 3T MRI machine.
Tom will start with a coil and system review upon arrival, and so we hope that as many future regular operators can be in attendance as possible on the first day (Mon, Dec 4). This will also help us configure the later training days to cover the things we are actually going to use (this training is usually geared toward clinical rather than research users).
So I can get a rough head count, please email me (msereno @ sdsu.edu) if you are interested in participating in one or more days of this training.
Finally, we will need some volunteer subjects for scanner training.
More detailed info on the schedule for the week coming shortly.
October 25, 2017 — Magnet Installation In Progress
Magnet Installation
The magnet installation is well along. The shielded room has been completed and tested, and the magnet successfully ramped up and down. The EIS building remains on schedule to be opened for initial move-in in December.
 Magnet inside completed shielded room
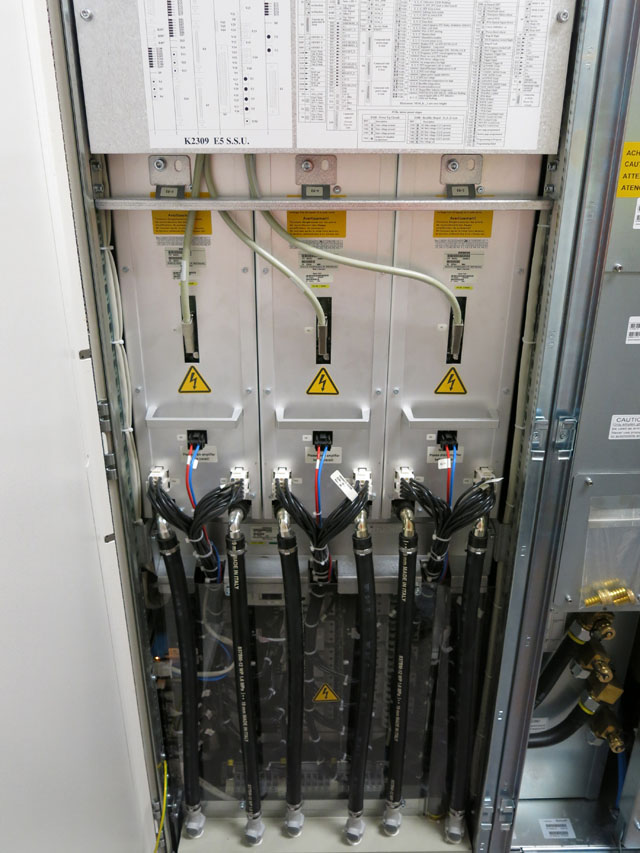 Our three one-million-watt water-cooled gradient ampifiers
 Our minus 452 degrees Fahrenheit fridge (4 deg Kelvin)
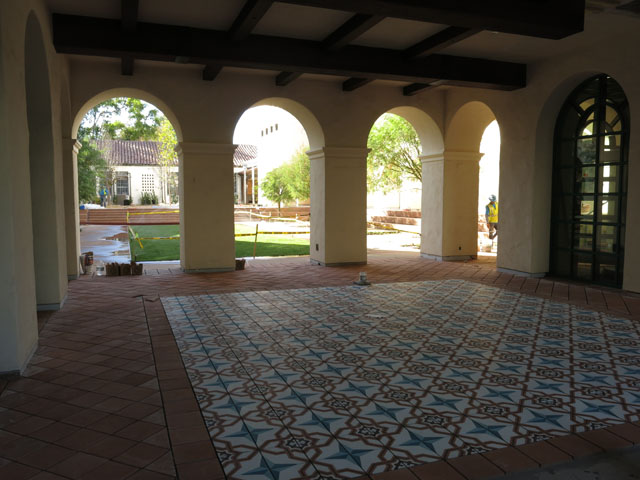 Courtyard tiles ready to grout
September 08, 2017 — Come to the Town Hall Meeting on Sept 14
Hi All
We will be having an informal town hall meeting to discuss progress and plans for the new SDSU neuroimaging center next week:
- Thursday, Sept 14
- Gold Auditorium
- Donald P. Shiley Bioscience Center
- campus map
- 11:30 AM - 1:30 PM
Hope to see you there.
Cheers,
Marty Sereno
Director SDSU Imaging Center
msereno at sdsu.edu
September 06, 2017 — Our (13 ton) Prisma arrives!
Here are some pictures of our new 13-ton Prisma being craned into the Engineering and Interdisciplinary Sciences building today. Some assembly is still required. The copper Faraday cage as well as tons of iron magnetic shielding will soon be wrapped around the magnet room as the Prisma is assembled, cooled down to almost absolute zero, brought up to field, and tested over the next month.
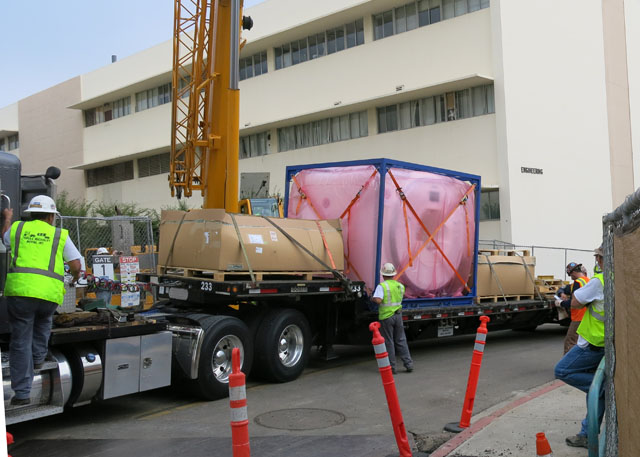 Still wrapped
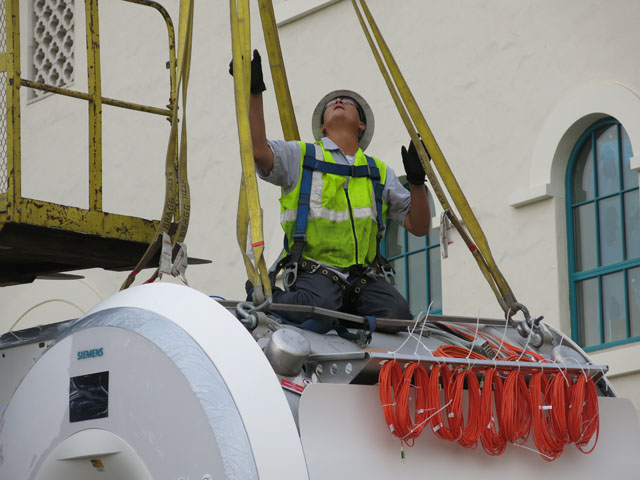 Ready to lift (red optical data cables)
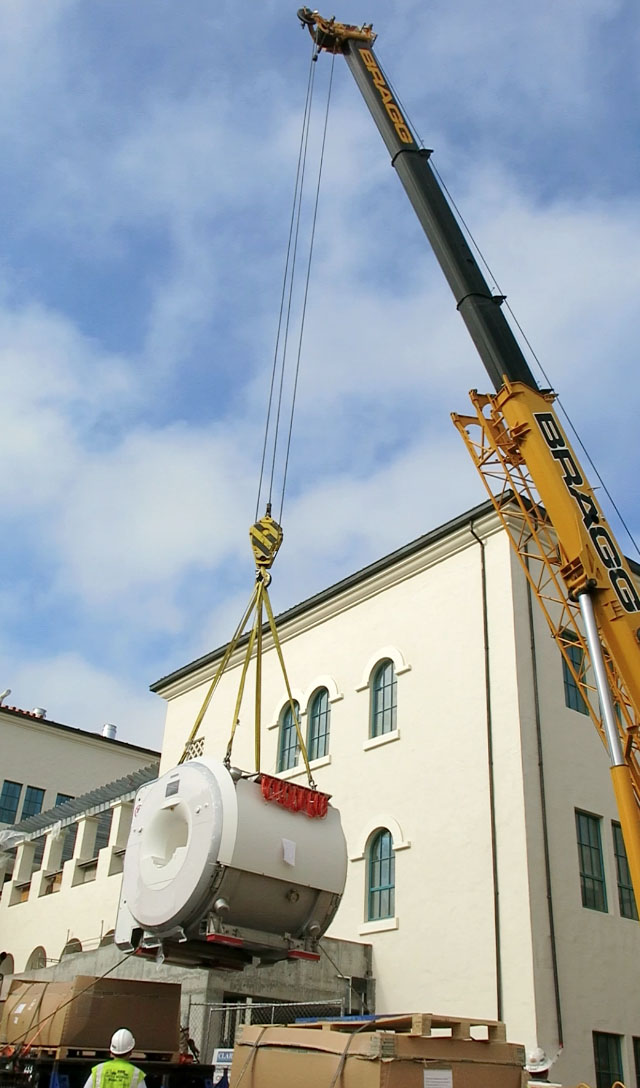 Up it goes
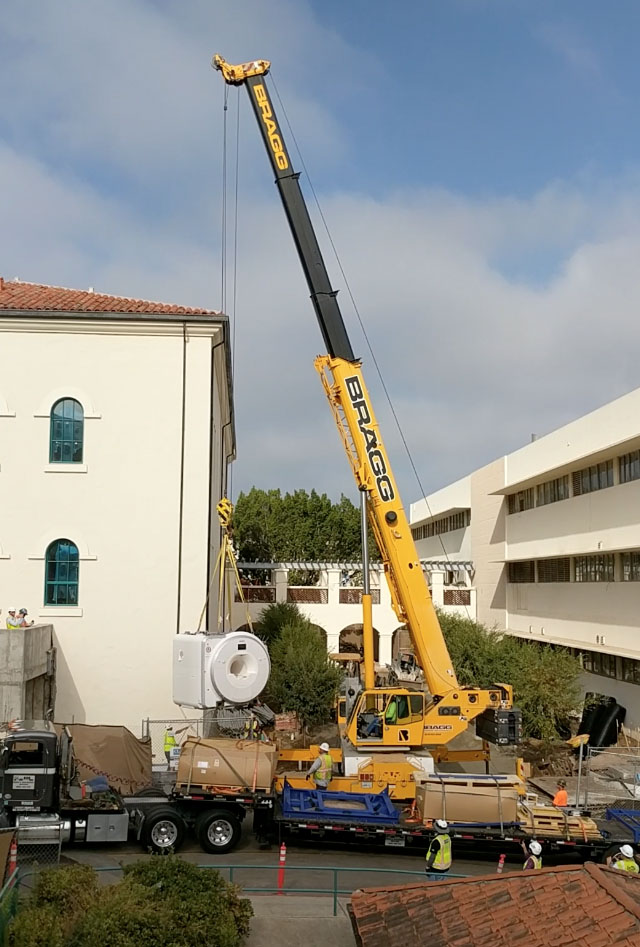 Almost there
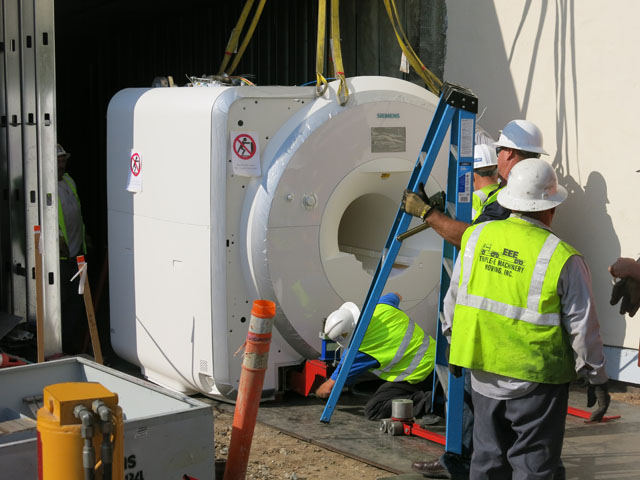 Onto rollers over plexiglass
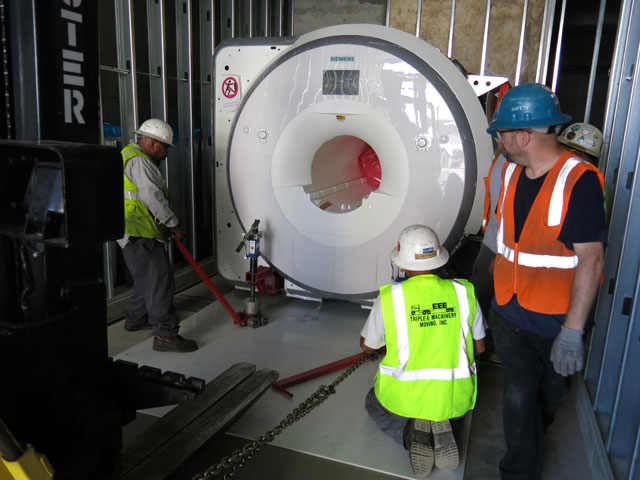 Safely down a ramp with the help of a forklift
August 30, 2017 — Our Prisma ready to be shipped!
August 25, 2017 — Outreach Letter from the Director
Hi all
I arrived at SDSU last Fall to help plan and direct the new SDSU MRI imaging center which will be sited in the new Engineeering and Interdisciplinary Science Building (EIS) on campus. The installation of our new Siemens Prisma 3T will begin early this September. The center should open for business for the San Diego neuroimaging community in early-mid 2018.
I wanted to reach out to all of you who might have an interest in the new MRI imaging center, so apologies in advance for overreach, and definitely feel free to forward this to any possible interested party.
We are planning a lunchtime meet and greet town hall meeting in September (details available soon).
Neuroimaging
One major research audience for the new magnet are people interested in imaging the brain with one or more of the different available MRI imaging modalities, including:
- structural imaging (e.g., quantitative T1 imaging)
- blood oxygen level detection (BOLD functional MRI, fMRI)
- tissue blood perfusion (arterial spin labeling, ASL)
- white/gray matter fiber direction detection (diffusion tensor imaging, DTi)
- magnetic susceptibility-weighted imaging
- hydrogen spectroscopy ('chemical shift' imaging)
I am particularly interested in finding out the kinds of stimulus and responses devices that different groups of people will be needing. Among other things, we have plans to set up both front and back projection for visual stimuli (including direct-view VR wide-field), eye tracking, high fidelity scanner-noise-cancelling audio presentation and recording, multichannel air puff stimulation, olfactory stimulation, bimanual responses, bore and hand cams, and possibly prospective video-based motion correction (new KinetiCor) as well as EEG-in-the-magnet.
But we will also have coils and sequences for imaging other neural and non-neural parts of the body. For example, it is possible to do midsagittal imaging of the speech articulators at reasonable frame rates using sequences originally designed for dynamic imaging of the heart. We will also have a spine coil as well as wrap coils.
New signals
We are planning to obtain research access to the magnet software environment in order to be able to design and compile new pulse and image processing sequences as well as to install and use those from other MRI centers. The development of new MRI pulse sequences is a very active research area -- MRI is 'not done yet'.
New analyses
Another area of active development in neuroimaging is software for analyzing structural and functional MRI data. There are many freely available well-suported software packages (e.g., AFNI, FreeSurfer, FSL, SPM); but neuroimaging is a fertile field for newly introduced big data learning and inverse methods and GPU image processing.
Multimodal imaging
MRI neuroimaging can be combined with other modalities (for example, EEG [mentioned above], TMS, tDCS, ultrasound, separately recorded MEG). This is another area of active development.
Post-mortem and non-biological samples
Inert samples can be scanned for longer periods (e.g., overnight) to increase resolution. This competes with more traditional histological techniques because of better geometry preservation.
Non-biological samples such as wet sediment cores can also be scanned. For best resolution, specialized RF coils can be constructed to get as close to the sample as possible.
Scanner-related devices
Finally, given the large number of magnets worldwide, there is a substantial market for new devices that can be used to deliver sensory stimuli in the magnet (visual, auditory, somatosensory, pain, olfactory, taste), directly stimulate the brain (TMS, tDCS), record record participant responses (manual, pedal, oral, vocal, GSR, EEG, eye tracking), or extend the magnet hardware (higher resolution RF coil arrays, baby RF coils, fixed tissue RF coils).
The most important requirement -- beyond an exciting new concept for a device -- is having an accessible, engineer-friendly magnet for prototyping and verification. The challenging MRI environment (magnetic fields, high-power RF, requirement for low RF emission to avoid imaging artifacts) is virtually impossible to simulate and verify without an actual magnet on hand.
You run the scanner
After safety training (the big scanner magnetic field is always on, even when the power goes off...), we will train you to operate the scanner yourself. Each new scanning project will begin with a brief (4 min) public project proposal presentation to give us a chance to help you refine it, to build our local imaging community, and to give researchers new to the technology a chance to see how it is done.
Be an early adopter
Once there has been time to submit and obtain grant funding for imaging studies at our new center, we will be charging users the standard hourly fee for scan time. In order to give researchers time to obtain preliminary data, and to submit and obtain grants sited at SDSU, for a limited time, we will offer heavily discounted scan time. I will be teaching a Foundations of Neuroimaging course (PSY 596) this Fall that will use the SDSU Learning Glass lecture recording system.
Email me
I am sure I have missed some people who might have interest in the new imaging center, so feel free to forward this message to interested parties in any department (or university) who might not have received it. Finally, feel free to contact me with any possible query, request, or interest you may have.
Cheers,
Marty Sereno
Director SDSU MRI Imaging Center
msereno at sdsu.edu
Background Image: "FishyTopy"
Claudia Fernety